Showing posts with label Rebecca Zdybel. Show all posts

Wednesday, May 27, 2015

30 Day Drawing Challenge Day 26- Free Draw

30 Day Drawing Challenge Day 26- Free Draw

Day 26 of our 30 Day Drawing Challenge will be a chance to draw in your own way, with your own choice of tools.  I've given so many options over the course of this challenge.  Today you can try something again that you enjoyed, or take something that was difficult and practice it another time.  Perhaps you could combine ideas from a few different days...

©Rebecca Zdybel
For my example above, I again used the Tombow Marker 947 which I recommended you purchase.  (If you would like to get one, it's around $5-6. Here is a link:  Tombow 947 Marker- Amazon)  I then formatted with a frame and added words for content.


For this example, I searched Google for a quote about orchids.  
Then I included it as part of  my sketch.
Contour Drawing with Tombow 947 Marker and Watercolor. ©Rebecca Zdybel 

Here are some more ideas:
  • Bring Balance and Content to your sketch with words...as I have in some of these sketches. For some examples of great fonts you might use follow this link:  30 Day Drawing Challenge Day 13- Find a Favorite Font
  • Create a vignette version of your image or soften the background around your image.  Here's the link that explains how to do it:  30 Day Drawing Challenge Day 17- How to Vignette
  • Think about formatting your image after drawing it by creating a frame that contains or intersects your image in an interesting way. Part of learning how to draw, is learning how to present your drawings and compose your work. These little drawing tricks are very helpful, but they need practice!  
    • Frames, words, and a little pop of color can add pizazz and lend composition to a solitary image.  Kind of like dressing it up or putting on makeup.  Your drawing may be inherently good looking, but it may look better with a little sumpthin' sumpthin' (that's how we say it down here in the South). I explain this concept more fully here: 30 Day Drawing Challenge Day 12- Draw, Format, Paint

Notice how the tape pattern on the brush handle is repeated in the background frame.
The curves of the lettering are also repeated in the curved edges of the frame.  This repetition brings harmony and improves the design of an otherwise simple sketch.  ©Rebecca Zdybel

Whatever you do, I hope you enjoy the meditative and personally rewarding aspect of making time to draw.  When you do, you will really see what's in front of you.  My time spent on art is always enriching, and I hope your time spent on this challenge ends up making you feel the same.  I'll be back with another challenge for you tomorrow...

Don't forget to send me your drawings! rebecca@artmyrtlebeach.com

Special Notice: 
My website will be changing to become more mobile friendly and add some new features.  If you are a subscriber, you will need to update your subscription.  A new notification will soon arrive in your inbox and ask for you to confirm your subscription.  It will be from my website server.  Just click that confirmation and you will continue to receive updates to this blog directly to your email inbox.  There is a button on my home page that allows you to subscribe, but if you'd like to subscribe and have not been able to do so, please email me and I will send you that link.   My email address is rebecca@artmyrtlebeach.com.  I have lots of new ideas and lessons I plan to share over the next few months.  I also will be traveling extensively during September and October and will be blogging about my adventures and my art along the way.  If you subscribe today you'll be kept up to date and share the all the fun!  I hope you do... <3

Here are some photos of fellow challengers' sketches...

Elegant Writer markers in various colors.  Nice vignette in the background!  

Zentangle is addicting...and when they turn out this well you can see why! Here's a link to my lesson on How to Zentangle from Day 20: http://www.artmyrtlebeach.com/2015/05/30-day-drawing-challenge-day-21_21.html


From Day 26- Draw a Teacup.  Beautifully done!
Happy Drawing!
I'll look forward to seeing what you do in your "free" time today. Don't forget to send me photos of your drawings =)


Rebecca Zdybel
Artist, Instructor, Art-Travel Instructor
Art Lessons: Drawing, Watercolor, Acrylic, Collage, Mixed Media
Myrtle Beach, SC
rebecca@artmyrtlebeach.com

Spread Light, Share Love, DO Art!

Feel free to share any of this blog post on your own blog or website, but I ask that you you include:
Rebecca Zdybel is an artist and instructor in Myrtle Beach, SC.  Follow her and see her work at http://www.artmyrtlebeach.com/


Join me on Google+ Rebecca Zdybel Google+ 

Tuesday, May 26, 2015

30 Day Drawing Challenge Day 25- Draw a Teacup

30 Day Drawing Challenge Day 25- Draw a Teacup

This sketch was done initially as a contour drawing with Tombow 947 Water-soluble Marker. Watercolor and permanent black marker also used. 
 Note the color in these shadows!  ©Rebecca Zdybel 

Guess what we are going to draw on Day 25 of our 30 Day Drawing challenge?  

That's right, a teacup.  

I've been asking a lot of you throughout the course of this challenge.  After trying lots of new things, a bit of review might be time well spent. You've earned a day where you get to make some choices in how you will draw.  Today I am only going to suggest the subject matter.  The method you use will be up to you.  


This sketch was done from life with only a Tombow 947 marker.  I had afternoon tea at a lovely Tea Room here in Venice, FL and took the opportunity to record the moment with this sketch.  So fun!  ©Rebecca Zdybel

I like to collect old china teacups, and lately I've been enjoying drawing them as well. We all probably have teacups somewhere in the cupboard, though yours may not look like mine.   Your assignment for today's drawing challenge is to find a teacup and draw it.  I want you to use all your new superpower drawing skills!  They are now becoming more finely honed with each passing day, so I'm giving you freedom to channel them...here's some thoughts:  
  • Think about bringing color into your shadows.  If you use your Tombow marker again today, it will already impart a bit of color if you make it run with a wet brush.  The same would be true of other water-soluble drawing materials. 
  • Consider whether you want to create a contour drawing of your subject or how you wish to approach it. (both of my sketches here began with contour drawings).  
  • Perhaps you'd like to use continuous line contour, begin with a Toned Ground or take a photo and draw it upside-down.  If you're not familiar with these approaches, then you can refer to these previous lessons by following these links: 
  • What drawing tool will you use?  Tombow markers, Elegant writer, Pencil or perhaps some other new favorite drawing tool.  Use this lesson as an excuse to try something you've not yet tried, or to pull out something you know and love.  Whatever you choose will be perfect!
  • Will you simply draw, or will you possibly add watercolor or mix drawing tools together in the sketch?  You decide.

When you finish your sketch, photograph it and send it my way so we can share the fun.  Here are a couple of nice sketches from challengers that have recently come my way: 


Day 24- Tombow Marker Sketch
Day 23- linking shapes with shadows


Enjoy your practice and I'll be back tomorrow with another fun challenge to get a fire lit under your sketchbook... or something like that ;-)


Rebecca Zdybel
Artist, Instructor, Art-Travel Instructor
Art Lessons: Drawing, Watercolor, Acrylic, Collage, Mixed Media
Myrtle Beach, SC
rebecca@artmyrtlebeach.com

Spread Light, Share Love, DO Art!

Feel free to share any of this blog post on your own blog or website, but I ask that you you include:
Rebecca Zdybel is an artist and instructor in Myrtle Beach, SC.  Follow her and see her work at http://www.artmyrtlebeach.com/


Join me on Google+ Rebecca Zdybel Google+ 

Sunday, May 24, 2015

30 Day Drawing Challenge Day 23- Linking Shapes with Shadows

30 Day Drawing Challenge Day 23- Linking Shapes with Shadows

Linkage is a design fundamental that describes the process of bringing unity to a piece of art by building connections.  Connections bring harmony and balance and all kinds of good design qualities to your work.  These connections can be made in many ways, but actual physical linking of shapes isn't always possible or may not make sense in your composition.  This is where shadows can play a very convenient role!

Designing better shapes is something we should all be thinking about.  Linking shapes is a really great way to achieve this.  For example, it's often a good idea when possible to take a series of repetitive small shapes and bring them together with connecting shapes.  This can create larger and more interesting shapes, or bring variation to what would otherwise be simple repetition. Again, this is a role that shadows were born to play!

Shadows can be anything from short and stubby to long and lean.  They can go in any direction.   They can GROW if needed to fill gaps.  They can also have color!

(We explored Color and Shadows in Day 21 of our 30 Day drawing challenge- Here's the link in case you missed it: 30 Day Drawing Challenge Day 21: Shadows/Color )

For all these reasons shadows are the perfect means for designing better shapes and creating linkage within your work.


An example of how you can GROW shadows to connect otherwise disconnected shapes ©Rebecca Zdybel 

Today's Challenge: 


Step 1: Draw 3-5 disconnected shapes using a contour drawing and ink.  I love clothespins as a subject, but you can pick anything (toothbrushes, brushes, pencils, crayons...etc.)

Hint: Leave gaps here and there in the contours of your objects to allow for color to visually flow in and out of the shapes and allow for a sense of bounced color from shadow to object. 

Step 2: Use shadows to connect your shapes and form a unified drawing.  Watercolor, watercolor pencils, or watercolor crayons would be a great to use in order to create colored shadows, but colored pencils or markers could also work well. 

Note that my shadows are not realistic, but they serve to connect my shapes together and create linkage.  They also provide a cool complementary color to the warm oranges of the clothespins.  

Step 3: Send a photo of your final result to me:   rebecca@artmyrtlebeach.com

Have fun with this drawing and file the idea away for future compositions when you sketch!  As we learn to draw, these little tricks of the trade can make our work so much better, and they are not that hard.  You just need to spend a little time digesting them. =)

Here are some drawings from the sketchbooks of more fellow Drawing Challengers:  

These all illustrate a very great danger in going down the Zentangle path...IT'S ADDICTIVE and very meditative...and BEAUTIFUL when done like these drawings demonstrate. Wow!  If you missed that lesson, it's available following this link. If you go there beware of the risk of instant addiction! 30 Day Drawing Challenge Day 20- Zentangle


I'm already looking ahead to later this week.  I will be breaking out my Tombow marker in burnt sienna color -947 for a sketch or two during the final couple of weeks of this challenge.  If you would like to get one, it's around $5-6. Here is a link:  Tombow 947 Marker- Amazon

Rebecca Zdybel
Artist, Instructor, Art-Travel Instructor
Art Lessons: Drawing, Watercolor, Acrylic, Collage, Mixed Media
Myrtle Beach, SC
rebecca@artmyrtlebeach.com

Spread Light, Share Love, DO Art!

Feel free to share any of this blog post on your own blog or website, but I ask that you you include:
Rebecca Zdybel is an artist and instructor in Myrtle Beach, SC.  Follow her and see her work at http://www.artmyrtlebeach.com/


Join me on Google+ Rebecca Zdybel Google+ 

Sunday, December 14, 2014

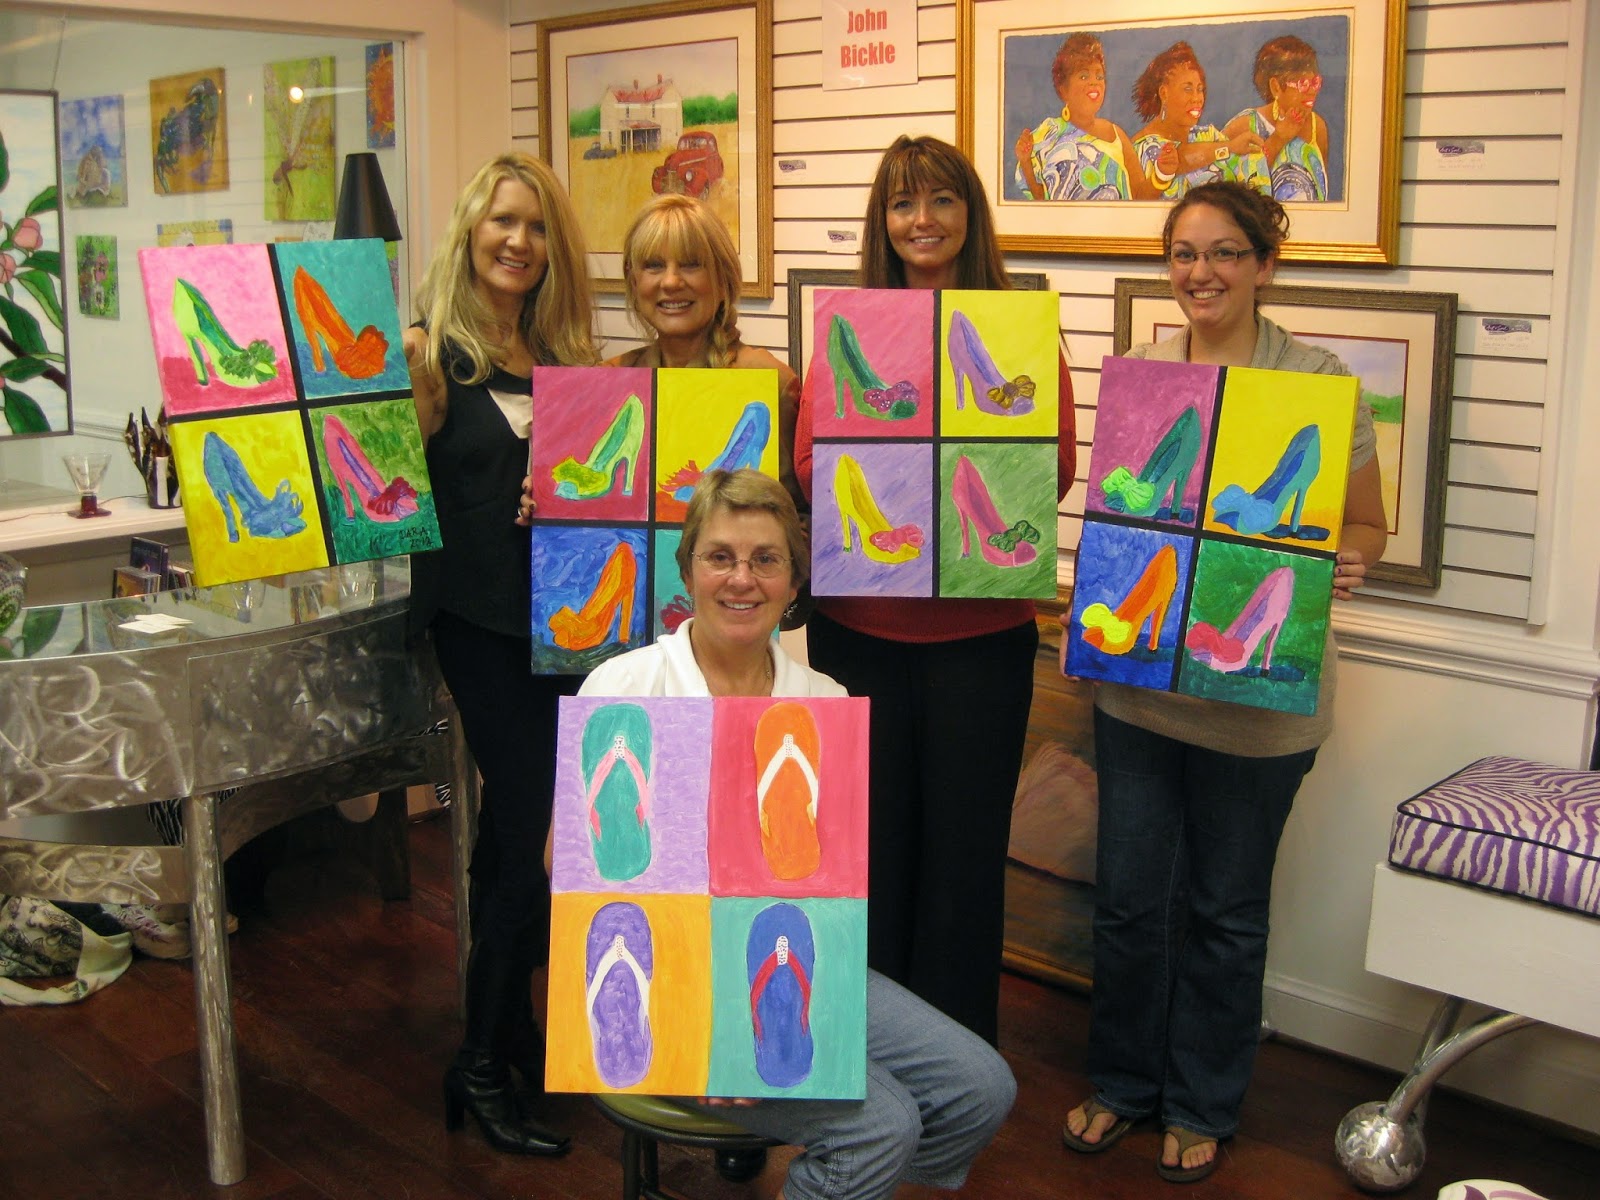
Arty Party- Gather Your Group and HAVE FUN TOGETHER!

What kind of activity engages everyone: senior, TEEN and youngsters?    Tired of family watching TV or on their cell phones?  Try this idea...
Have an ARTY PARTY!  

Spend time together doing something UNUSUAL and MEMORABLE.   It's EASY- just contact me and we can make it happen!  

New Convenient Location near Barefoot Landing in Myrtle Beach!
I Was Fired In SC- Pottery Painting Studio
4021 Hwy 17 S, North Myrtle Beach, SC 

Here's how to schedule your event and lots of photos from past Arty Party fun...


Arty Party- Check out all the fun in these images from past parties!


Fun for family and friends...  You bring the smiles and I'll help you with everything else. 
Schedule your Arty Party TODAY!
Call or text 843-450-2307 
or email rebecca@artmyrtlebeach.com

Rebecca Zdybel
Artist, Instructor, Art-Travel Instructor
Art Lessons in all media
Myrtle Beach, SC
rebecca@artmyrtlebeach.com

Spread Light, Share Love, DO Art!

Feel free to share this blog post on your own blog or website, but I ask that you you include:
Rebecca Zdybel is an artist and instructor in Myrtle Beach, SC.  Follow her and see her work at http://www.artmyrtlebeach.com/


"Like" my facebook page: Rebecca Zdybel- Artist
Join me on Google+ Rebecca Zdybel Google+ Profile

Saturday, July 19, 2014

On Location Lesson 1...Choosing Your Subject

On Location...Lesson 1

Tips for Choosing Your Subject

All the Painters at work in St. Chamarand, France


Painting on location is one of my favorite things to do!  In preparation for my next trip with students to Tuscany Oct 3-10, 2015, I thought I'd begin a series of posts oriented toward helping you get great photos and pick where you should paint when you're out of the studio and on location, or "en plein air" as they say in France.  This first lesson gives some hints on to how to frame your shot. Whether you're a photographer, or a guerrilla painter, hopefully you'll find food for thought here...
St. Chamarand, France
Vue de la Rue- St. Chamarand, France
11x15 watercolor- Rebecca Zdybel


When on location, deciding on your subject...what to paint and how to paint it can be difficult.   Once you find an interesting subject, the next decision you face is how to frame your subject to best advantage?  These are some good questions to ask yourself:
  • What angle will you use? 
  • Where is the best view? 
  • Will your subject be most interesting viewed from head on, from the side, from below, or from above? (hint: look for interesting shapes and angles)
  • How much time do you have to paint or draw?  (if not much: then pick something simple.)
  • Is there a good pattern of lights and darks?
  • What interesting features do you want to highlight?
  • Is there shade or a place to sit and be comfortable? 
  • Where is the nearest bathroom? This is NOT A JOKE, lol!
  • Do you hear thunder?  Also NOT a joke...Take shelter!  (I learned this the hard way right after the photo b!)
Setting up to paint in St. Cirque la Popie-
Don't ignore gathering Dark clouds even if it's bright and sunny...
Needless to say, I didn't get very far before we had to RUN for shelter!

Hint: Use Your camera as a Viewfinder

If you have a subject which excites you and you're not sure whether or not it will make a good painting...TAKE A PHOTO. It used to be that artists would carry little cardboard viewfinders in their bag, but these days, we all have cameras.  Cameras have essentially made it unnecessary to bring an extra viewfinder.

When possible, make an effort to view your subject from multiple perspectives through your camera.  Assess your photos, and then let the best photo help you decide how to compose your painting.  Digital cameras, phones, and iPads or tablets make this easy.  
(I have found that tablet screens e.g. iPads are very difficult to see in the bright sunlight.  They are also cumbersome as camera's...often taking a long time to focus and shoot).  


Scene from Gigouzac, France (Landscape orientation)


Same scene- Gigouzac, France portrait orientation with sunshine
Once you find the right vantage point and get ready to begin your sketch, here's another TO DO LIST:

  • I will frequently take a photo with my iPad if I have it.  Sometimes I use it onsite as a quick reference to begin my drawing.  
  • ALWAYS TAKE A PHOTO ONCE YOU ARE SEATED AND BEGIN YOUR DRAWING.  This will record your unique seated perspective for future reference if you need to alter your sketch or complete it once you get back in the studio.  Remember: If you take a photo while standing, your horizon will be at standing eye level.  If you sit down, the seated position lowers the horizon line and changes all perspective lines. 
  • TAKE ANOTHER PHOTO IF THE LIGHT IMPROVES OR CHANGES.  (Shadows change, and some light patterns are more interesting than others.)

In my next installment I'll give you some tips on solving some of the perspective problems which can arise on location.  Subscribe to this blog so you'll get them delivered to you as soon as they're posted. 

Thanks to those who have been leaving me comments.  I really enjoy hearing from you!


Rebecca Zdybel
Artist, Instructor, Art-Travel Instructor
Art Lessons in all media
Myrtle Beach, SC
rebecca@artmyrtlebeach.com

Spread Light, Share Love, DO Art!

Feel free to share any of this blog post on your own blog or website, but I ask that you you include:
Rebecca Zdybel is an artist and instructor in Myrtle Beach, SC.  Follow her and see her work at http://www.artmyrtlebeach.com/


"Like" my facebook page: Rebecca Zdybel- Artist
Join me on Google+ Rebecca Zdybel Google+ Profile


Tuesday, July 8, 2014

Angelic Warrior Joins Me to Fight Arthritis!

Children have a wonderful way of being open to ideas and welcoming of new experiences without expectations.  Think about it...we all began that way! Yesterday, I was reminded of how fabulous it can be to experience painting with the heart of a child.  Join us for this fun watercolor art lesson.  It's great for young kids or the "young at heart".  


It was my privilege to participate in the SC Arthritis Foundation's Fundraising Project for 2014. I was asked to work with a child from Myrtle Beach who has been diagnosed with arthritis.  My role was to help her develop a piece of art which could be sold for fundraising purposes.  With that in mind, I met this little Art Angel...

Arianna Sanchez is READY!!!

This little Art angel is a warrior!  

She is in a battle with arthritis.  

But she is not about to let that stop her!


She came to my studio along with her sweet mom and brother, and we set off to CREATE something!
Perhaps you'll enjoy her journey as an artist and want to share it with a child in your life.  In fact, maybe your Inner Child will be so inspired that you may want to give it a try...I hope so!  We all had fun with it, and you may too...
Rebecca Shows Arianna some of the materials they will use
I showed her some of the materials and gave her lots of verbal instruction. Given her age, I approached it as a color exercise.  Our First Step: Crayon lines as "wax-resist"... we made random lines and got loosened up with some mark making on the page. 
Adding a bit of yellow watercolor
Then I had her use large hake brushes and with a pure lemon yellow color, she created a winding path of yellow on a wet piece of watercolor paper.  You can't see the crayon lines, but they added some "resist" to the watercolor, creating white or relatively light lines. 

Setting a pure Manganese blue in beside the yellow and then helping it find a path to the edge was the next step. Try not to mix the colors, just set them next to one another. As I often say: 

"Water paints better than I ever could."

Next comes blue and then comes pink!
Along the way, I had her note what colors resulted when blue merged with yellow (green).  Then we added some pretty Opera Pink, but the stipulation was...add it next to any color except "Green".   When she added the pink, we noted what color resulted when it merged with Blue (purple)  and when it merged with yellow (orange). She and her brother had big fun naming the colors and figuring out where she could put them.

We continued to add strong mixes of watercolor, all the while placing colors next to one another rather than mixing them together.  Instead, we sprayed with water to encourage their mixing.  We continued our guessing game about what color would result from our additions.  We added Winsor Red, and avoided placing it next to "Greens".  We added American Journey's Arctic Ice, but avoided placing it next to "Orange". Then one at a time, with instructions of what colors to avoid, we added more pink, blue and yellow.  (Avoiding the complementary colors helps to keep the colors bright.)  As she did her additions, a variety of beautiful colors emerged on the paper.

How about some RED! 
Once the page was full of color, we added some salt for texture in places where the paper was not as "shiny".  At least for a while, we were able to restrain the application of salt to the dry areas...then it was so much fun pouring salt, that things got a bit salty!  But that's ok, we have to let go and have some fun along the way, right?!

Then it was time to paint with the blow dryer.  Some of the deep wells of color could be moved in lines with the force of the blow dryer.  Things also need to dry before we could move on...soooooo
Painting with the blow dryer!


After blow-drying our paper, and blow-drying her brother, and lest we forget, of course we had to blow-dry mom... 
After everything was dry, we ended up with a beautiful bright page full of color and texture.


Next came the lines....To add the lines, we made big sweeping gestures with Elmers Glue.  Once the lines travelled around the paper, we added more salt...(oh yesssssss!) but we did so by pinching a bit between our fingers and dropping it directly into the wet glue lines.  Here we are doing this step.  (Since Arianna's arms were a bit short for our big painting, I gave her a had with the glue)  We all helped put salt into the wet glue.

Once the glue lines were salted, we set about adding the same colors next to one another along the lines.  This requires a gentle touch.  Simply touching the glue lines with a loaded soft brush full of paint works best.  There were so many lines that Big Brother, Christian needed to lend a hand!


Beautiful colored lines begin to form all over the page...so much fun!


Then it was time to get out the blow-dryer again...watch out mom!

After drying completely,  it was time to do a little coloring with American Journey Watercolor Sticks.  They are a fun water media product that goes on like a crayon, and dissolves like watercolor.  Arianna used those to intensify some of her colors and create a few strategic dark shapes.  I limited her choices to ones which would keep her out of color trouble, and encouraged her to search out a shapes that had been formed by the lines we had created. I had her color till she was tired of coloring in each shape, and then spread the color the rest of the way  with a wet brush.  She liked being able to quit on a shape when she felt like it, and just letting the water do the rest...

Once she had a page full of beautiful colors and lines, I thought giving her composition a calm border might be nice.  So together, we added a white acrylic border along the edge.  
 Finally, the painting needed her signature.  She looked at the piece from all directions and decided which way it should hang.  I suggested a place for her to sign it and she used 2 pieces of paper as a guide for placement, and for how large to write her signature.  I had her use graphite, to make it easy to write her name.  She did it perfectly! 
"Keep On the Sunny Side" Painting by Arianna Sanchez
Mixed media of Watercolor and Acrylic on Paper.  18"X24"
Painting will be available for sale 
Don't you just love her painting?  Comment here and I will share those comments with Our Art Angel and her sweet family.  If you're inspired to help her and other kids like her, join us in the fight against Arthritis, and attend the Masquerade Event in Charleston, SC follow this link:  
https://arthritismar.ejoinme.org/MyEvents/2014DvineAffair/tabid/517287/Default.aspx

August 3  Gallery Show to celebrate each piece created this year at Lowcountry Artists Gallery 1-3pm Charleston, SC

September 6 D'Vine Affair Masquerade Gala Benefitting the Arthritis Foundation. at Memminger Auditorium  Theme: Masquerade--Faces of Arthritis7 pm
Charleston, SC


Rebecca Zdybel
Artist, Instructor, Art-Travel Instructor
Art Lessons in all media
Myrtle Beach, SC
rebecca@artmyrtlebeach.com

Spread Light, Share Love, DO Art!

Feel free to share any of this blog post on your own blog or website, but I ask that you you include:
Rebecca Zdybel is an artist and instructor in Myrtle Beach, SC.  Follow her and see her work at http://www.artmyrtlebeach.com/


"Like" my facebook page: Rebecca Zdybel- Artist
Join me on Google+ Rebecca Zdybel Google+ Profile

Wednesday, June 4, 2014

Cave Art Mystery!

The mysteries just keep on getting bigger!  Cave paintings similar to those found in Europe have been found high in the cliffs of the Great South African Escarpment.  REALLY?!  How is that explainable?

If you are as intrigued by all this as I am, be sure you read my previous post, and then you may enjoy this video...Let me know what you think~


Let me hear from you! I'd love to know your theories...
Ancient Apparitions -Watercolor, acrylic gesso, ink on paper  11X15 $300
Rebecca Zdybel


Rebecca Zdybel
Artist, Instructor, Art-Travel Instructor
Art Lessons in all media
Myrtle Beach, SC
rebecca@artmyrtlebeach.com

Spread Light, Share Love, DO Art!

Feel free to share any of this blog post on your own blog or website, but I ask that you you include:
Rebecca Zdybel is an artist and instructor in Myrtle Beach, SC.  Follow her and see her work at http://www.artmyrtlebeach.com/


"Like" my facebook page: Rebecca Zdybel- Artist
Join me on Google+ Rebecca Zdybel Google+ Profile

Saturday, May 31, 2014

Carcassone, France

Using Toulouse as my base of operations, I rented a car and drove to a couple of different places.  Carcassonne, is an impressively intact fortified medieval city. It is beautiful to look at and I thought it might be fun to see in person.  I was thinking about setting up from a distance, and trying to paint or draw the exterior fortifications.


I rented a small car, and without consulting me, I was given a stick-shift vehicle.  Thankfully that was  not a problem for me.  I did request a GPS, and that was a life-saver.  The roads were well marked, but I would probably not have been as successful navigating aroundp the countryside on my own unless I had the GPS.  If I had a companion to help me navigate, it may have been possible to get by without it.

According to maps, Carcassonne was about 60 miles (90 km) and so that seemed about an hour from Toulouse.  If you go by car, follow the signs from City Center of the Lower City to 'Le Cite'.  That seems to be the designation they give to the castle area.  I took the "scenic route" on the way there (the one without toll roads), and it was not worth the need to stop and go.  I'd definitely opt to drive the toll road both ways next time.  The scenery was actually better from the toll road.  The took about an hour on the toll road.


I went despite what I'd read on Rick Steve's website. The reviews were not great, and in the end, they were right.  Though it was impressive and majestic to see, it was not at all authentic.  Really, it was pretty much a tourist trap...but, nonetheless, I'm glad I saw it.  If you go, don't plan to spend a long time. A walk through is fine.  The church has pretty stained glass inside, should you want to take a look.  The wind can be VERY strong, as it gets channeled through gaps in the walls.  Plan on wearing an extra layer if it's at all cold.  All in all, it's a beautiful to look at, but lacks soul.  Not a place to hang out.  The wind was so intense, I decided to draw it another time.

Cassoulet is the specialty of every dining establishment. I might eat elsewhere or even bring a picnic, since you can get into Le Cite' for free.


 This is the double wall around the city.  This space between the two walls used to have a moat in between the walls!

If this city were to be attacked, you'd definitely need to plan on starving them out, because there would be no way too break through these walls and moats.  


Though my trip was not as I'd expected it to be, I was happy I went.  Ironically, the hardest part of the trip was figuring out how to get out of the parking garage! It's funny how stupid you can feel when you can't process the words in front of you.  

On the way back, I stopped at Le Grand Round in Toulouse and enjoyed a park, Boulingrin. Beautiful on a weekend afternoon...with Toulouse natives enjoying the sunshine and the gardens there.  I happily painted a little sketch there where I had some sunshine and very little breeze.  All in all a great day.

Here's some photos from the park, and a little sketch from my afternoon spent there...


Let me hear from you! I read every comment and it means a lot to know you are out there reading.


Rebecca Zdybel
Artist, Instructor, Art-Travel Instructor
Art Lessons in all media
Myrtle Beach, SC
rebecca@artmyrtlebeach.com

Spread Light, Share Love, DO Art!


Feel free to share any of this blog post on your own blog or website, but I ask that you you include:
Rebecca Zdybel is an artist and instructor in Myrtle Beach, SC.  Follow her and see her work at http://www.artmyrtlebeach.com/


"Like" my facebook page: Rebecca Zdybel- Artist
Join me on Google+ Rebecca Zdybel Google+ 


Copyright 2012 Rebecca Zdybel.  All Rights Reserved.
Designed and Maintained by Myrtle Beach Website Designer